> ## Documentation Index
> Fetch the complete documentation index at: https://docs.videfy.ai/llms.txt
> Use this file to discover all available pages before exploring further.
# Getting Started
## Create your first video in Videfy
This guide walks you through the full Videfy workflow, from creating your first project to exporting your finished video. You’ll learn how each step works so you can move quickly while staying in control of your creative process.
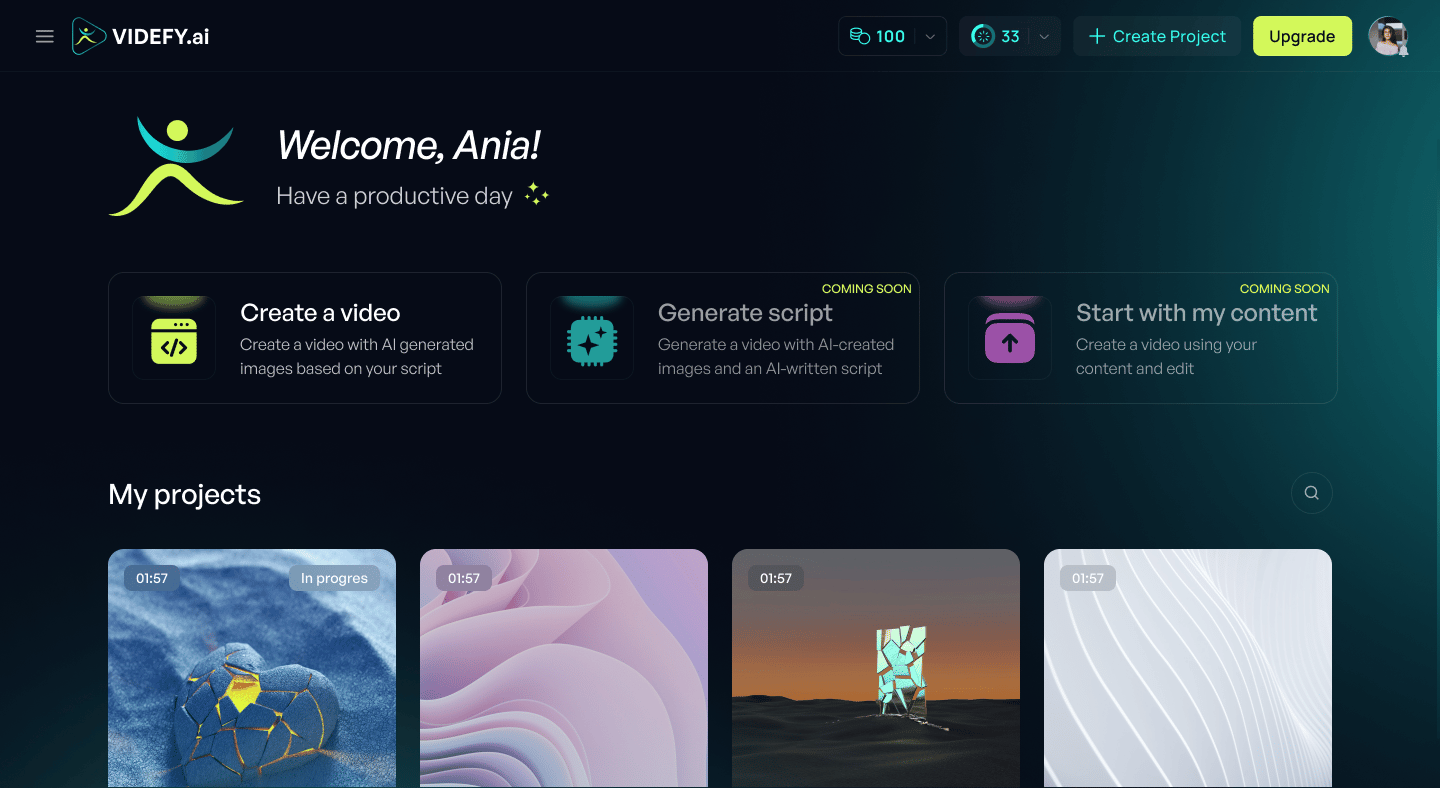
### **1. Dashboard: Your Home Screen**
When you log in, you’ll land on the **Dashboard**. This is where all your projects live.
From here you can:
* Open existing projects
* Create a new project
* Rename, duplicate, or delete projects
To get started, click **Create a video**.
 ### **2. Create Your Story**
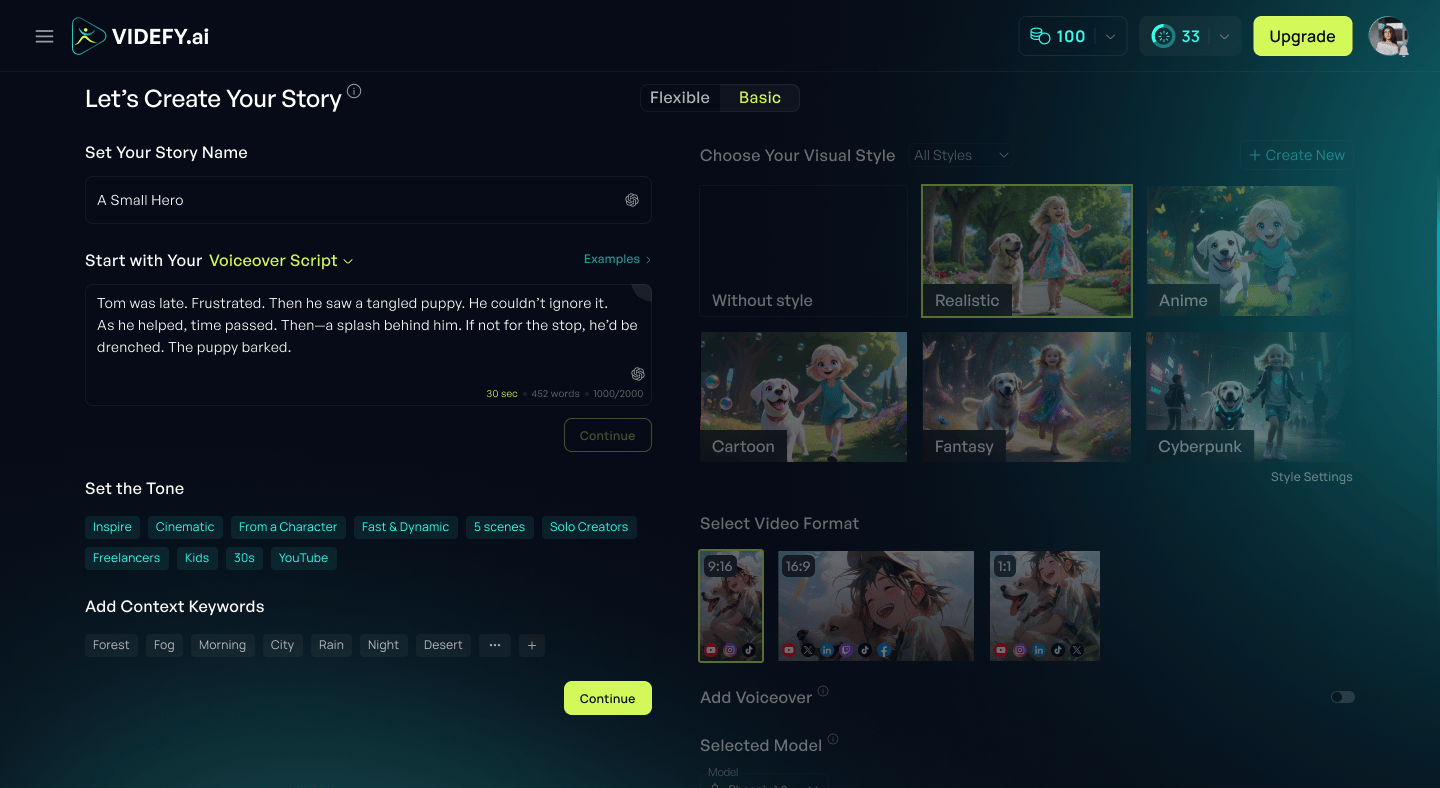
After creating a project, you’ll be taken to the **Let’s Create Your Story** page. This is where you define the foundation of your video.
Here you’ll set:
* Your script or idea
* Visual style
* Video format
* Optional AI assistance for prompts, illustrations, characters, and voiceover
### **2. Create Your Story**
After creating a project, you’ll be taken to the **Let’s Create Your Story** page. This is where you define the foundation of your video.
Here you’ll set:
* Your script or idea
* Visual style
* Video format
* Optional AI assistance for prompts, illustrations, characters, and voiceover
 #### **2.1 Choose a Script Type**
Videfy supports three ways to start your story:
* **Idea** – Write a short idea and let Videfy generate a narration script for you.
* **Voiceover script** – Paste a finished narration if you already have one.
* **Scene Flow** – Define each scene manually for maximum control.
#### **2.1 Choose a Script Type**
Videfy supports three ways to start your story:
* **Idea** – Write a short idea and let Videfy generate a narration script for you.
* **Voiceover script** – Paste a finished narration if you already have one.
* **Scene Flow** – Define each scene manually for maximum control.
-1.png?fit=max&auto=format&n=uIQq_KibiQwxFrYy&q=85&s=a38620d4927e585956eb2a468b0440a4) Choose the option that best fits how much structure you already have.
#### **2.2 Add Your Voiceover Script**
If you’re using a voiceover-based flow:
1. Write or paste your voiceover script
2. Click **Continue**
3. Select **Tone & Context Keywords** to guide generation
4. Click **Continue** again
Videfy will automatically split your script into scenes.
Choose the option that best fits how much structure you already have.
#### **2.2 Add Your Voiceover Script**
If you’re using a voiceover-based flow:
1. Write or paste your voiceover script
2. Click **Continue**
3. Select **Tone & Context Keywords** to guide generation
4. Click **Continue** again
Videfy will automatically split your script into scenes.
-1.png?fit=max&auto=format&n=uIQq_KibiQwxFrYy&q=85&s=7840ab6cc956a6c97339c561fe8c0007) You can:
* Edit scene text
* Add or remove scenes
* Regenerate all scenes if you change the script
When everything looks right, click **I Love It**.
#### **2.3 Choose a Visual Style**
Next, select or create a **Visual Style**. This style will be used for generating images and videos.
You can change the visual style at any time later in the process.
#### **2.4 Select a Video Format**
Choose the aspect ratio for your video:
* **9:16** (vertical)
* **16:9** (landscape)
* **1:1** (square)
You can:
* Edit scene text
* Add or remove scenes
* Regenerate all scenes if you change the script
When everything looks right, click **I Love It**.
#### **2.3 Choose a Visual Style**
Next, select or create a **Visual Style**. This style will be used for generating images and videos.
You can change the visual style at any time later in the process.
#### **2.4 Select a Video Format**
Choose the aspect ratio for your video:
* **9:16** (vertical)
* **16:9** (landscape)
* **1:1** (square)
 This can also be changed later if needed.
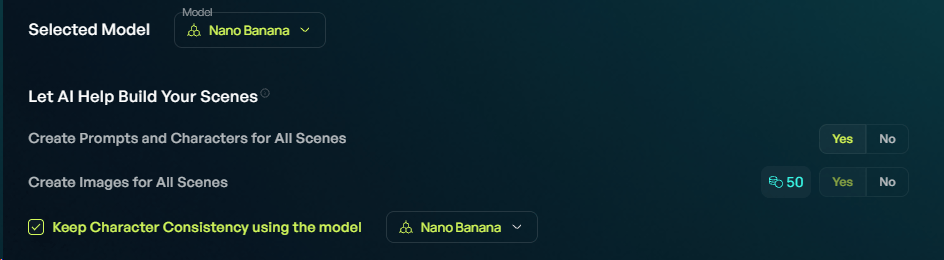
#### **2.5 Let AI Help Build Your Scenes (Optional)**
You can speed things up by enabling AI-assisted options:
* **Create Prompts for All Scenes** – generates prompts for each scene
* **Create Illustrations for All Scenes** – generates images (requires prompts to be enabled)
* Keep Character Consistency – Maintains the same character appearance across all generated scene images
This can also be changed later if needed.
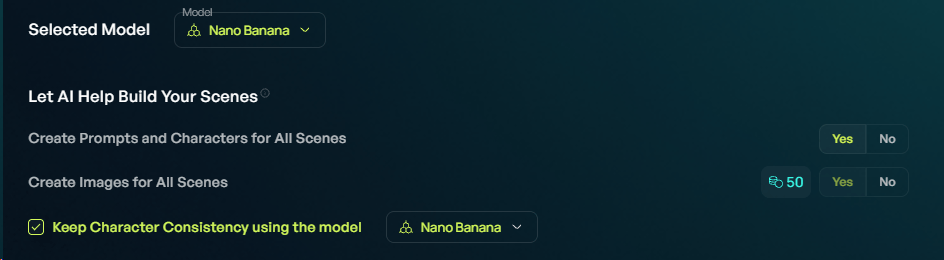
#### **2.5 Let AI Help Build Your Scenes (Optional)**
You can speed things up by enabling AI-assisted options:
* **Create Prompts for All Scenes** – generates prompts for each scene
* **Create Illustrations for All Scenes** – generates images (requires prompts to be enabled)
* Keep Character Consistency – Maintains the same character appearance across all generated scene images
 Even when AI is enabled, you can still edit prompts and visuals manually at any time.
#### **2.6 Characters**
If prompt generation is enabled, Videfy can also create characters automatically based on your script.
Even when AI is enabled, you can still edit prompts and visuals manually at any time.
#### **2.6 Characters**
If prompt generation is enabled, Videfy can also create characters automatically based on your script.
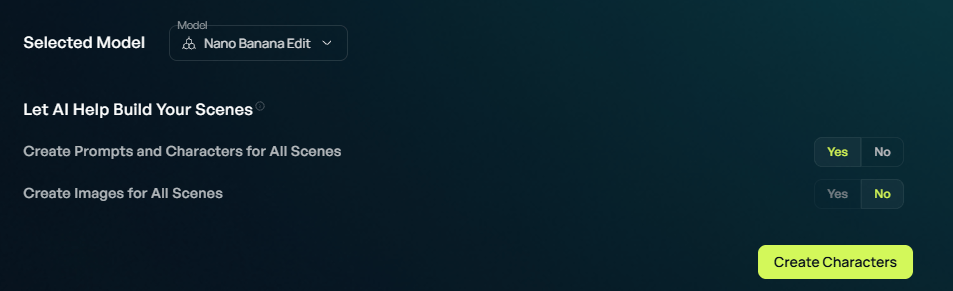 * You can edit characters manually at any time
#### 2.7 Add Voiceover
Next, choose how you want to add narration to your video.
* You can edit characters manually at any time
#### 2.7 Add Voiceover
Next, choose how you want to add narration to your video.
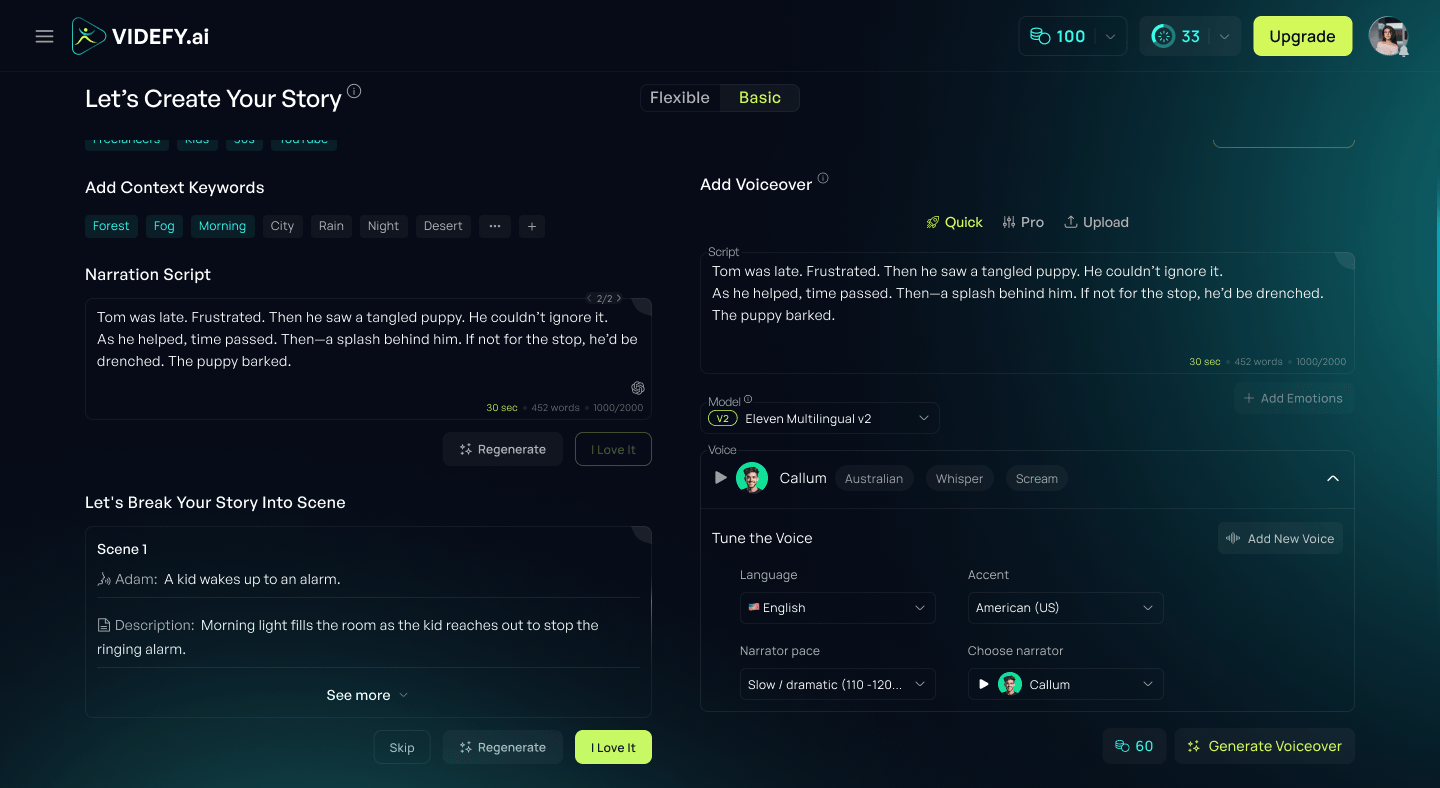 You can either:
* **Generate a voiceover using Videfy** – Turn your narration script into AI voiceover
* **Upload your own voiceover file** – Use audio you’ve already recorded
When generating a voiceover, you can use:
* **Quick** – Generate narration quickly with simple voice settings
* **Pro** – Access more advanced voice controls
* **Upload** – Add your own audio file instead of generating one
In Quick mode, you can choose the voice model, language, accent, narrator pace, and narrator.
When you’re ready, click **Generate Voiceover**.
Videfy shows the estimated duration, word count, character usage, and credit cost before generation, so you can review everything before creating the final voiceover.
### **3. Storyboard**
Once your story setup is complete, you’ll move to the **Storyboard**. This is where you generate and organize your scenes.
You can either:
* **Generate a voiceover using Videfy** – Turn your narration script into AI voiceover
* **Upload your own voiceover file** – Use audio you’ve already recorded
When generating a voiceover, you can use:
* **Quick** – Generate narration quickly with simple voice settings
* **Pro** – Access more advanced voice controls
* **Upload** – Add your own audio file instead of generating one
In Quick mode, you can choose the voice model, language, accent, narrator pace, and narrator.
When you’re ready, click **Generate Voiceover**.
Videfy shows the estimated duration, word count, character usage, and credit cost before generation, so you can review everything before creating the final voiceover.
### **3. Storyboard**
Once your story setup is complete, you’ll move to the **Storyboard**. This is where you generate and organize your scenes.
.png?fit=max&auto=format&n=uIQq_KibiQwxFrYy&q=85&s=74ba850cdcad016fe65c4bb51266f86d) From the Storyboard you can:
* Generate images, videos, and prompts
* Reorder scenes
* Add or remove scenes
#### **3.1 Automatic Generation**
If you enabled AI options earlier, Videfy will automatically start generating:
* Prompts
* Illustrations
* Voiceovers
#### **3.2 Compact vs Extended View**
You can switch between two storyboard views:
* **Compact view** – Quickly review and organize scene order
* **Extended view** – Edit prompts, choose image or video per scene, adjust settings, and access Gallery or My Items
From the Storyboard you can:
* Generate images, videos, and prompts
* Reorder scenes
* Add or remove scenes
#### **3.1 Automatic Generation**
If you enabled AI options earlier, Videfy will automatically start generating:
* Prompts
* Illustrations
* Voiceovers
#### **3.2 Compact vs Extended View**
You can switch between two storyboard views:
* **Compact view** – Quickly review and organize scene order
* **Extended view** – Edit prompts, choose image or video per scene, adjust settings, and access Gallery or My Items
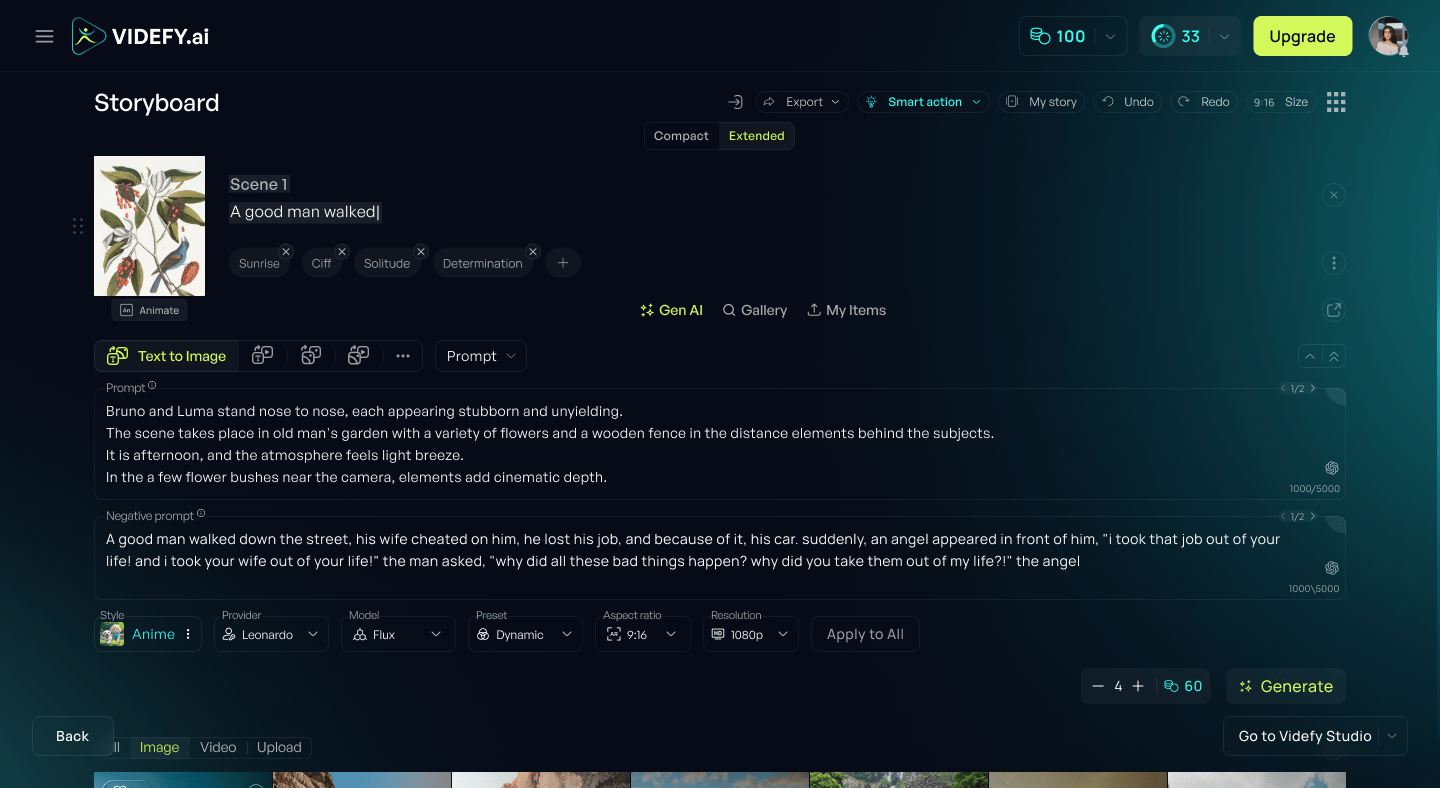 #### **3.3 Generate Images or Videos**
To generate visuals, open **Extended view** or click **Edit Visual** to generate & edit content per scene
#### **3.4 Timeline (Storyboard Stage)**
At the bottom of the Storyboard, the timeline lets you:
* Move clips
* Remove silences
* Upload assets
#### **3.3 Generate Images or Videos**
To generate visuals, open **Extended view** or click **Edit Visual** to generate & edit content per scene
#### **3.4 Timeline (Storyboard Stage)**
At the bottom of the Storyboard, the timeline lets you:
* Move clips
* Remove silences
* Upload assets
 When everything is ready, click **Go to Videfy Studio**.
### **4. Videfy Studio**
The **Videfy Studio** is where you polish your video before export.
When everything is ready, click **Go to Videfy Studio**.
### **4. Videfy Studio**
The **Videfy Studio** is where you polish your video before export.
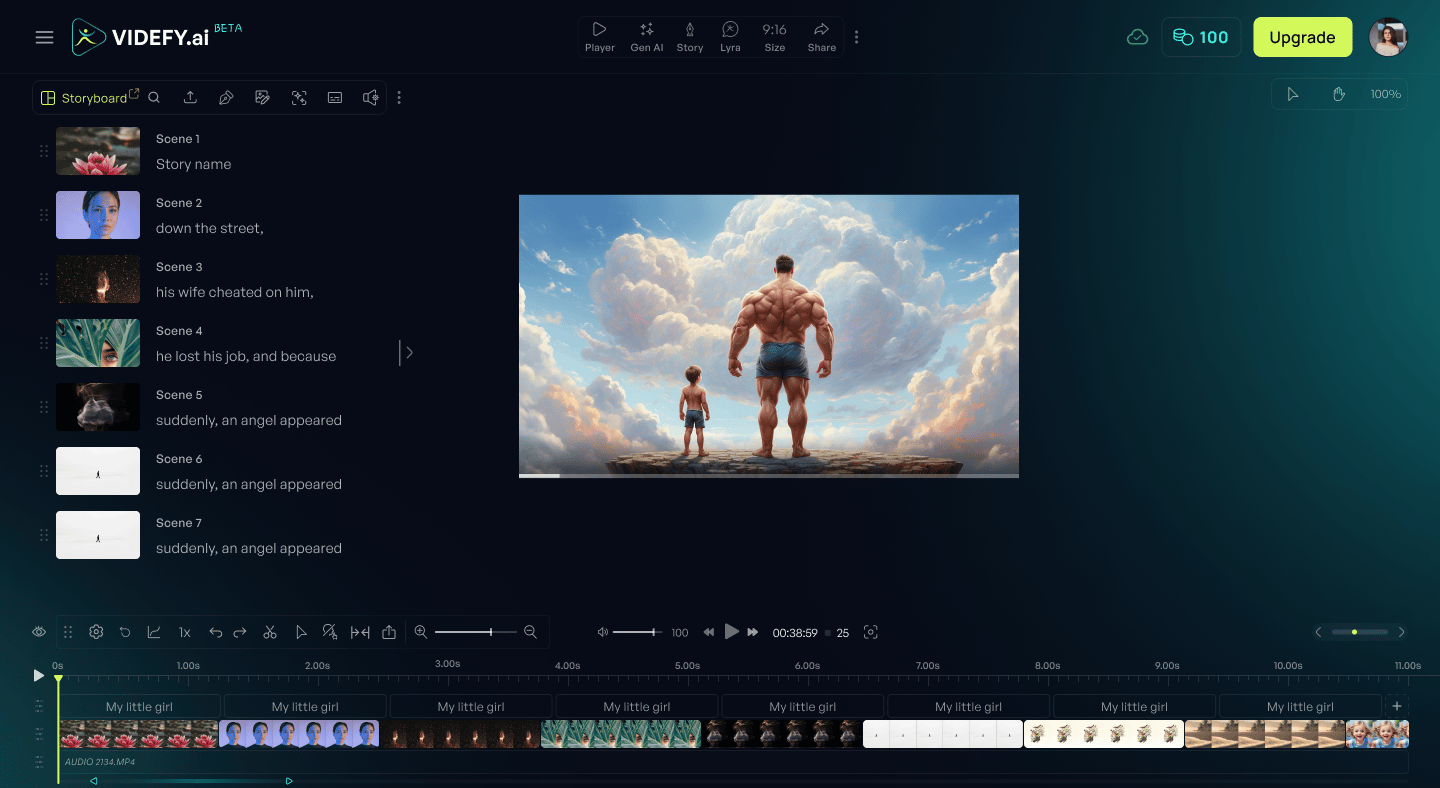 Here you can adjust visuals, timing, audio, subtitles, transitions, and effects.
### **Main Areas in Videfy Studio**
* **Canvas** – Preview your video and position overlays, visuals, and subtitles
* **Storyboard panel** – Manage scenes without leaving the editor
* **Timeline** – Edit clip duration, add effects, transitions, filters, and keyframes
* **Timeline toolbar** – Quick editing tools directly on the timeline
* **Sidebar panel** – Access overlays, subtitles, audio tools, transitions, and effects
* **Top navigation panel** – Generate or replace visuals, edit prompts, access Gallery and My Items, change video format, and export your video
## **What’s Next?**
Once your video looks right:
* Use **Export** from the top panel
* Download or publish your final video
You’re now ready to create with Videfy!
Here you can adjust visuals, timing, audio, subtitles, transitions, and effects.
### **Main Areas in Videfy Studio**
* **Canvas** – Preview your video and position overlays, visuals, and subtitles
* **Storyboard panel** – Manage scenes without leaving the editor
* **Timeline** – Edit clip duration, add effects, transitions, filters, and keyframes
* **Timeline toolbar** – Quick editing tools directly on the timeline
* **Sidebar panel** – Access overlays, subtitles, audio tools, transitions, and effects
* **Top navigation panel** – Generate or replace visuals, edit prompts, access Gallery and My Items, change video format, and export your video
## **What’s Next?**
Once your video looks right:
* Use **Export** from the top panel
* Download or publish your final video
You’re now ready to create with Videfy!